Pages

Showing posts with label Changing to a crunchy side. Show all posts

Friday, May 3, 2013

Saving a life with Safe House

After losing our cat Riesen, I've been checking out the cats and kittens on craigslist.  I saw an interesting ad stating Barn/Shop/Warehouse Cats Looking for Work.  I was intrigued and decided to take a look.

I was nothing less than surprised.  The listing brought me to a site called Safe House, a program committed to sterilizing, vaccinating and rehoming cats.  What surprised me was the program that they offered that I have never seen before.  Safe House has a special Barn Cat Program.  These are cats that have been brought to shelters and have been deemed unadoptable.  Safe House will come and rescue these cats and get them in this program.  Safe House does not take feral/wild cats off the streets, rather they save those cats that have been brought into shelters.  In regards to finding feral cats, Safe House's site states, "The most important thing to remember is that feral cats should never be taken to animal control pounds or shelters.  Because feral cats are not socialized, cannot be socialized, and are wild animals unsuitable for adoption, even no-kill shelters are not able to place feral cats in homes - they will almost certainly be killed immediately."

The Safe House barn relocation program works solely on donation.  These cats are free with the promise that they will be taken care of, however, donations are welcome and very much needed.  If you live in IL from Rockford, to Princeton, to Joliet to McHenry or anywhere in between, Safe House will bring you your new, neutered/spayed/up-to-date vaccinated mouser to your barn, shop, or warehouse complete with the kitty condo and litter box she will need during her 2 week acclimation period.

In addition to the barn program, Safe House also has cats that are looking for homes with people to call their very own.  These are cats that have been given up by their previous owners for different reasons.  Safe House works with foster homes, cats live with a family, in a home, awaiting adoption.  The foster parents will be able to give you an honest description of the cat's personality so you may make a proper decision on whether a particular cat is a match for you and your family.  Adoption for these pets is $50, the cats will be spayed/neutered, up to date on their shots, dewormed, microchipped and tested for FIV and FeLV.
Ernie is part of the Barn Cat Program.  He is a young, medium sized, orange tabby.

Jim Bob is part of the Barn Cat Program.  He is a young, medium sized, white and gray tabby.

 
Kevin is a medium sized, adult, male tabby.  He is available for adoption

 Bessie is a large, adult, black and white female.  She is available for adoption.

Safe House is a nonprofit organization, run exclusively on volunteers.  "We focus on rescuing at-risk pets, adopting these pets into loving homes, practicing Trap Neuter Return as the humane and effective solution to community cats, and offering impounded feral cats a second chance at life as working mousers through our Barn Cat Program. Safe House is a no-kill organization where no pets are ever euthanized for space."

To learn more about Safe House and the organization or to view the other adoptable cats, please visit their website or Facebook


Taking home a pet is a big commitment, one that should not be made lightly.  If you are not sure if you are ready or if you are not able to have a cat but would still like to help, visit their "Get Involved" page here.

Vicky

Monday, March 25, 2013

Growing a greener life

I am amazed at how my life is changing and how easily Hubby goes along with it.  I've always wanted to do greener things.  Growing up I wanted to change the world.  In sixth grade I was first exposed to recycling when I took a recycling/planet/general healthy earth class, I wanted to do something to help the world.

In college I decided I was going to major in environmental geology and geoscience.  For various reasons (only one being me realizing that the degree wasn't what I was looking for), I left college.

This left me in a predicament.  How was I supposed to change the earth if I wasn't fixing it on a grand scale?  Recycling wasn't enough, everyone recycles.  I knew there was more I could do, I just had to find it.

Around this time I discovered cloth diapers, mama cloth, cloth wipes, and homemade/organic/or concentrated cleaning supplies.  Some have worked better for me than others, but they were all working towards the same cause.  Throughout this though, one (of many) that has continued to bother me is the disposal for food, food scraps, and other organic waste.  We've used the garbage disposal but I keep hearing about the negatives to the water treatment plants not to mention my pipes.  I cringed every time I threw something in the garbage can, those items that should decompose in days will last in landfills for years, sometimes decades.

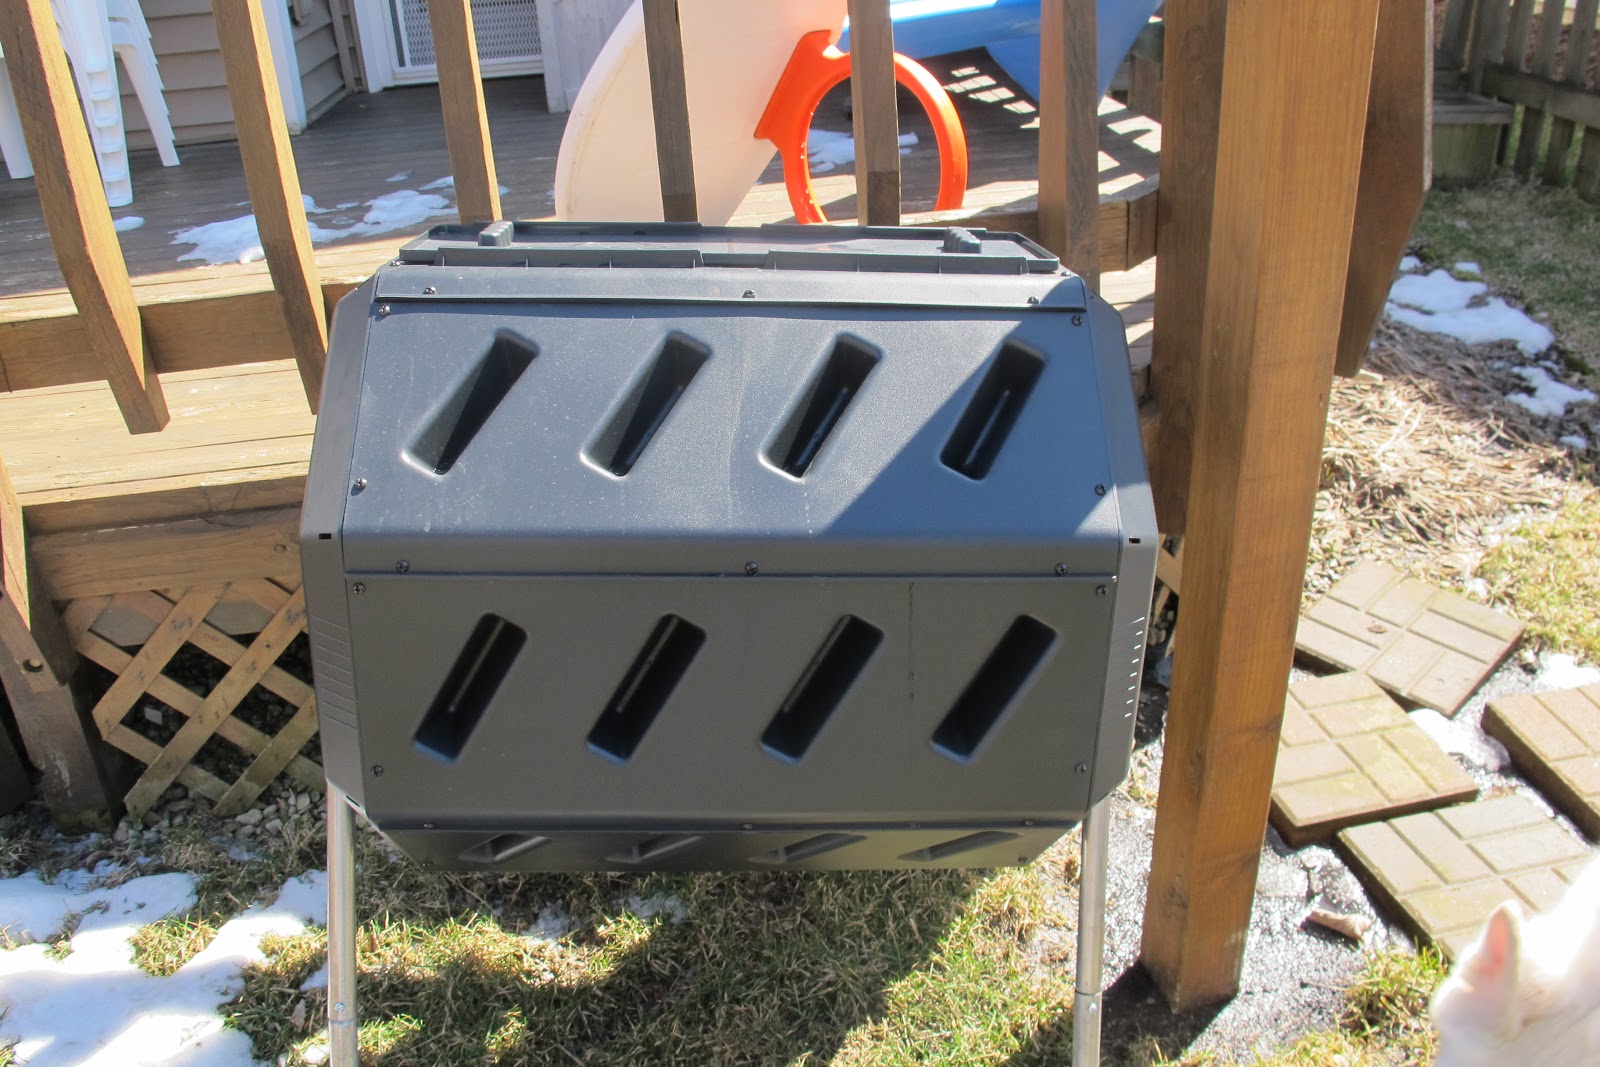
This left me with one solution: composting.  I looked and decided doing a compost pile probably wasn't what I wanted to do, but a tumbling compost bin sounded perfect.  I was able to keep everything contained and turn it without the aid of a pitchfork.  A few spins every few days and it was good to go.  We're able to fill up our plastic collector container in 2-3 days; the recommended number of days you should leave the bin without spinning.

I was absolutely amazed at what I was able to put in my tumbler.  It wasn't just food scraps, paper products such as paper towels and egg cartons.  Odder things that I hadn't thought of such as pickles and alcohol, and very strange things like moldy soy "milk" and dryer lint.

We keep our container in the bottom drawer of the refrigerator.  At first I thought this sounded gross, keeping old, yucky food in the 'fridge.  Then I realized that I've had food go bad in there before, this was being stored for 2 days and in 2 days it wasn't going to go bad or get moldy.

Tumbling composters take far less time simply because they are in an enclosed black container.  I have little patience when it comes to some things and when I decide I'm going to do something like this, I want to do it now... and I expect it to work.  Now.

As I said, Hubby was a bit leery of getting it, especially in the middle of winter when the temperature is usually below 20 degrees.  I think I've turned him to the crunchy side enough that after watching the amount of food scraps go into the garbage that he finally decided that it was a good idea.  He still thought I was crazy and teased me about being excited BUT he was the one who rushed to put it together when it arrived in the mail.

I'm hoping the location works out.  It's right off the deck, next to our clothesline.  I knew I wouldn't want to go out all the time when there was a foot of snow out there if I had to walk across the yard.  I have a feeling it won't be easy to move if we don't like the location.

Only time will tell how our composting excursion goes, but for now, I'm looking forward to using it in our garden this summer.  (Our garden is a whole different issue!)

Vicky

Wednesday, March 13, 2013

Diapering for under $150?

Is it possible?  Diapering your child from birth to potty training for $150, it must be too good to be true because surely the only way this is possible is by either practicing elimination communication* or, or, or what?  It must be impossible.


It is indeed possible and it isn't an unrealistic idea.   Even better, if you continue through the post, you will find even more ideas to save money.

If you haven't figured it out, it does involve cloth diapers.  Not a terrible choice and not something that needs to be difficult.  Cloth diapering is becoming more popular and more and more parents are choosing this green option that saves the planet and money.  (How often are you able to be green AND save money?)

Although I was able to get the number under $100, I felt $150 was more realistic.  You might be thinking, "Yikes!  Buying all those diapers for $150.  I can't afford to pay $150 upfront."  Lucky for you, most women find out they are pregnant early on in their pregnancy.  Start saving $5 a week and you will have saved the $150 by the time your bundle of joy arrives.  A pack of middle of the road diapers can cost you around $.12/diaper if you change your baby 10 times a day (as newborns tend to pee often) you will pay $1.20 a day on diapers.  At $1.20 a day or $8.40 a week (versus the $5 I mentioned) you will pay for all of your cloth diapers and cloth diapering gear in 125 days or 4 1/2 months.

This list does not include changing pads or a diaper bag as these are things you would already be needing or using.  That said, I say use an old towel and backpack work great for a changing pad and diaper bags (this is true for cloth or disposable).

So, let's begin!

$48 - 24 flat diapers
$45- 5 one size diaper covers at $9 each
$1.50 - 4 diaper pins
$15 - 1 diaper pail liner or wetbag
$24 - 2 overnight diaper

Grand total = $133.50

This will diaper your child for 2 days.  Wash the diapers on the second day and use the second overnight diaper while most of the other diapers are in the wash.  

Flat diapers are a great deal.  They are a single layer of material folded into a shape to fit onto a baby of different sizes and genders.  Different folds leave more material in the front versus the middle and you are able to make the diaper smaller to fit your small baby.  The flat diapers I bought when Bug was a baby still fit him today.  Yes they come in toddler size, but at this time, I have not needed to purchase them.


The picture on the left Bug is about 3 months old.  It is an angel wing fold, basically the square flat fold twice and wrapped around the baby.  The picture on the right is the same size diaper.  This was taken a few days ago, Bug is 2 years and 3 months.  It is folded in an origami fold with an extra doubler.  He wandered around for a while without a cover.  The absorbency of a flat is surprising.


<--The back of an origami fold.


Bug wearing a flat under a cover. ---->


Other ways to save:

-You are able to use cloth wipes as well!  Make your own with repurposed material.  I cut up a pair of old sweatpants with shot elastic.  There are sprays and solutions you can make out there or use warm water to wipe your baby's bum.

-Instead of using a wet bag or pail liner, use a plastic garbage bag.  These will not be machine washable.

-For an out and about wet bag, use a gallon sized wet bag.  As most of these commercials claim, they are leak proof, they can hold 3-4 dirty flats and you can wash these by hand.

-Don't buy fancy diaper detergent.  Many people like Original Powder Tide.  I've used Purex Free and Clear with no issues.

-Lengthen the life of your covers by hanging them or laying them out to dry.  Flats and covers dry fast.  If left out overnight they will be dry in the morning.  PUL covers should not be left in the sun for long periods of time, the sun will eventually ruin the material.

There are other things you may wish to buy:
- Extra absorbency pads, as your baby grows and wets more, extra absorbency may be wanted, or you can just use 2 diapers at once
- Liners for the inside of the diaper (makes flushing the poop much easier but completely unnecessary)
- Different fasteners - You may wish to buy a different fastener.  Many people find them easier than pins and is why you will pay between $-$6 for them
- A diaper sprayer**

Now you may be thinking, "But Vicky, what about all that water we'll be using and wasting and paying for by having to wash our diapers?"  I will say, I was quite surprised how little our water bill went up.  So little in fact that when I asked Hubby about it, he said he didn't even notice.  If it did go up, it was no more than a couple of dollars a month, or 2 days of diaper changes.  "But Vicky, what about all the extra time to wash those diapers?"  Well, it does take time to wash them but I put ours in the washing machine at night and in the morning I stick them in the dryer.  Doesn't take up any of my time.  I have found that the biggest time spent with the laundry end is the spraying and the folding.  "YUCK!  I hate folding clothes."  Well, if you're doing flats, they're no different than folding a square pillowcase.  There's no folding involved with the covers.  "YUCK!  Spraying poop!"  Yeah, well, poop is gross but I've had poop ooze and drip out of disposables, squish out onto car seats, get my shirt, pants, robe, socks.  I still have to deal with poop and until they're potty trained and able to wipe their own butts (and wipe them well) I will be dealing with poop.

There is one more issue that I am not able to say I've had to deal with: a laundromat.  I've always had access to my own washer and dryer.  If you do not, you may wish to buy 3 dozen to cut back on how many times you have to head over to the laundromat.  Bringing them home wet and hanging them dry, be it inside or out, will save you money on each load.  For those who are a bit more daring, hand washing is also an option.  Make sure you rinse any poop off in the toilet and wash all soap out until there are no suds.  Soap residue will cause diaper rash and will cause the diapers to stink when they are dirtied again.  This is when being a single layer is also useful.

Now you may be thinking that you remember seeing pictures or posts of my kids wearing different diapers, not just flats.  Very true.  (Thanks for paying attention and being a loyal reader!)  Like most things in life, it doesn't have to be all or nothing.  There are many different types of diapers but if saving money is what you are  want the most, flats are by far the way to go.

Good luck and happy diapering!


Vicky

*Elimination communication: starting at a very young age, parents watch for signs of child eliminating, including, but not limited to, grunting, timing, and other things I don't understand.  (I do not recommend following this description to teach your child elimination communication.)
**This is not at all necessary but I will say I like ours and it has kept Hubby from changing his mind against cloth diapering.  It has also helped wash puke out of clothes, sheets and winter coats.

Friday, November 16, 2012

Homemade applesauce

I love, love, love applesauce and so does everyone in the house.  I also like baking new things, especially things that smell good.  I don't know too many things that smell better than cooking apples with cinnamon - it's no wonder there are so many candle companies that make Apple Cinnamon scents, it's because it's delicious!  Growing up my mom used to make cooked apples in the microwave sprinkled with cinnamon and sugar.  It wasn't anything amazing or unusual, but we always liked it.  I decided to try my hand at applesauce on the stove.  It shouldn't be too difficult, if you cook apples long enough you can smash them: so that's exactly what I did.

I used 4 apples and quickly realized after it was on the table that a 1:1 apple/person ration would be best.  So when 5 people were at the table, we were sadly, 1 apple too short.  I'll go ahead and redo this again using 6 or 7 apples, they were a big hit and, although not a ton of work, it is enough work that I want to make sure everyone has enough.

Homemade applesauce:

6-8 apples - try to use at least 2 different types of apples and avoid sour apples like Granny Smith
3-4 Tbsp apple cider - I will probably use apple juice when cider isn't available
cinnamon and sugar to taste

1. Peel and chop apples into 1/2" cubes.
2. Place all the ingredients into a deep sauté pan*.  Cook covered about 20 minutes, stir frequently**.  Apples are done when they are soft enough to mash.
3. Mash them with a fork to the consistency/chunkiness you prefer.  Eat them warm or cold but remember, there aren't any preservatives and treat leftovers as you would any other leftovers.

Enjoy!

*My pan is about 3" deep and 10" wide, the 4 apples filled the pan about halfway up.
**If you notice the pan is getting dry add an extra Tbsp of cider or juice.


I added a bit too much cinnamon to this batch.  Hubby said it tasted like really good pie filling.  Hmmm... maybe I'll be making some apple pie this Thanksgiving.  Maybe.


Vicky

Monday, November 12, 2012

Apple pieces

I got the idea from eating apple chips and making pumpkin seeds.  I'm certainly not the only one who has thought of it and I'm sure my recipe isn't exactly original.  I'm not sure, I figure if I don't look other recipes up, I won't know and therefore I can claim this as an original.  :)

Ingredients:
Apples
Cinnamon and sugar (optional)

Directions:
1. Preheat oven to 250°F

2. Slice the apples as thin as possible, I recommend using a mandolin.  I also cored the apples, I know in the crispy bags, you can eat the seeds, but all I could think of is cyanide laced apple seeds.

3. Line a cookie sheet with parchment paper.

4. Make a thin layer of apple slices on the parchment paper and stick in the oven on the second to bottom rack about 6" from the bottom.

If you are making it with cinnamon and sugar follow steps 1 & 2:

3. Use a very small amount of cinnamon and sugar.  You may choose to use only cinnamon.

4. Layer on the parchment lined cookie sheet and stick in the oven.

Cook it for 2 hours.  Flip the apples after about an hour.  These will come out chewier.  They will not be crispy as the bagged kind from the grocery store.  Either way, we finished 4 apples in 1 1/2 days.


My Pampered Chef mandolin.  I'm not even sure if they still sell them!  I've had it for years and (gee surprise, surprise) it works great.


In the oven.  Be sure to keep the door closed and only open a couple of times to keep it hot inside.  This was not what I would consider a thin layer.  Next time I will use fewer apples to allow for a thinner layer.

Mmmmm....  all done and ready to eat.

The cinnamon apples took a bit longer to cook and ended up being a bit soggier because of the extra sugar creating juice.  They were still very good and were gone before the plain.

The obvious advice:  I suggest not sticking your arm in to flip the apples but rather take the cookie sheet out.  If you decide to  not take this advice, at least use a mitt.

We never had a chance to store them in anything as they were eaten too quickly.

Vicky

Monday, May 21, 2012

Making a difference

I've recently made the jump to a greener lifestyle.  I've been doing cloth diapers for a while now and realized that I am buying all these nice soft diapers for my babies' bottoms, avoiding the chemical and icky feeling for them, but month after month I am continually using disposable pads for myself.  Before I heard about the different types of cloth diapers, I never even thought that there could possibly be a different option!  Those options died long ago when disposables were invented and women realized that having a one-time sticky-backed winged pad was much easier than, than what?  I had no clue.  What did they use before?  Moss, at least that's what they must have used according to authors of fictional prehistoric novels.  I guess after that they used rags, hence the wording "on the rag".  I didn't really give it much thought after that though because, again, it still wasn't making any sense.  Those poor women had to wash them.


Then I decided to cloth diaper my babes.  I joined a cloth diaper forum and learned all about cloth diapers and other ways of being green.  I joined a crunchy moms forum and learned even more about being green.  It didn't take long for me to learn about cloth menstrual pads.  Often called "mama cloth", "mama pads", and "cloth menstrual pads".  My first thought was, "What?!" Then I heard more about it, learned more about it and thought more about it.  I decided, maybe I'd go ahead and take the plunge.


So there was also another issue about using the disposables, the trash and the money.  Well it turns out women spend a lot and throw away a lot during their fertile years.  According to The Keeper*, in 10 years, one woman will spend approximately $480 and produce 65.6 lbs of waste.  A woman can easily triple this number and end up spending $1,440 and produce 196.8 lbs, that more than the average American adult man. **


1 year of pads and tampons is about 6.6 pounds.*

10 years of pads and tampons is approximately 65.6 pounds.*


Back in December I started with panty liners.  I hadn't gotten my period yet after having Bug so I decided just to start with the liners.  I really liked them!  It saved my underwear and was basically just washed with the rest of my laundry.  It's no different than washing my underwear.  Then I decided I'd go ahead and buy some for when I actually got my period.


I'll admit, I was a little nervous.  I was surprised though.  It wasn't so bad.  I had bought 7 different pads and a few different brands, all with fleece backing and all with wings.  No slipping, no sliding and nice and comfy.  I rinsed it out and stuck it in a wet bag.  The pads go in the wash with towels, no fabric softener, they're dried in the dryer and then they're done.


All of mine have a minky top.  They are sooo soft.  The type of material it is also is amazing at not staining.  It was one thing I did not want to have.  The thought of having a pad that was instantly stained was kind of a turn off.  It's been 3 months, I now have 10 pads and none have stains.  I am so glad I made the switch.  It is the best decision I made since getting rid of our disposable diapers.

+++Stay tuned for coupon coming up in the very near future!+++=

Vicky


*Pictures and numbers taken from The Keeper.

Tuesday, January 24, 2012

Not for the delicate - crunchy gone bad

Over the last 2-3 years I've found myself heading towards "the crunchy side".  It first happened when before I got pregnant with Bug.  I decided to take the plunge to use a "cup".  For those of you who do not know what a "cup" is, I will spare you the gory details and say that it's an internal cup for that time of the month.  No pads or tampons required.  If you really want (or need) to know, I suggest you check out their website.  Talking about parts of my body is a bit embarrassing.  Of course, typing it to a bunch of strangers is somewhat acceptable.  Anyways... I found that I was a "cup" flunky.  It didn't really matter though, three months into using it, I got pregnant with Bug.


Then my crunchiness continued.  When I was about 6 months pregnant, with Monkey still in diapers, I slowly convinced Hubby to start using cloth diapers.  After much thought on his part, he agree.  He assumed it would save us money, of course that was before...  So now I'm a full fledged cloth diapering addict.


Bug is now 15 months, Monkey will turn 4 on Saturday and (thank you God) is 99% potty trained.  So my crunchiness continues.  I decided that me being a "cup" failure wasn't going to deter me from being green and that I needed something else to buy since I obviously couldn't be buying a ton more diapers.  So I decided to try using reusable menstrual pads.  I have yet a need to use them, but I'm ready for when the need arises.


So on the couch was just one.  It needed to be put away but I had a TON of laundry to put away.  Sunshine says to me, "Mommy, what is this?"


Uuuhhh.  Uuuhhh.  Now, I really haven't given it any thought as to when a good time to explain a woman's body and the need for those but it certainly wasn't 3 days after she turned 6.  So, with the answer that would make any 1950's housewife proud, I promptly answered, "Uuuuhhh, don't worry about it."


Sunshine: "Yeah, but what are they?"


Me: "They're mine so don't worry about it."


Sunshine: "Is it for your arm?"


What?  Me: "No, it's not.  It's for grown-ups and that's all you need to worry about."
The more I answer, the more ridiculous I hear myself sounding but really?  This should not be a conversation.


Sunshine: "Yeah but it has these little snaps on them and if you put them together it looks like it can go around your arm."  Then she proceeds to snap them and and tries to put it on her arm.


For those who have no idea what I'm talking about, the little snaps go around the undies to keep them in place.  They're the wings of your pads.  Like I said, I haven't needed them, they just needed to be put away.


Oh.  My.  God.


To make matters worse, I was in the middle of changing Bug's diaper and wasn't able to get up and snatch it out of her hands/off of her arm.


At this point she thinks she is being funny and is laughing at me and my embarrassment.  All I can do is hope that this is one of those moments that she will not remember when she finally learns about the birds and the bees.  Apparently that will happen when she is in 5th grade and won't be happening by me.

Vicky